Setting up a landing page for your next project!
— Tutorial — 3 min read
Are you ready to bring a business idea to life but don't know where to begin? One important step is to validate your idea before investing a lot of time and resources into building it. This is where a landing page can come in handy.
This tutorial will guide you on how to quickly set up a landing page to gauge interest and validate your business idea.
What you'll need
| Tool | Description | URL |
|---|---|---|
| Gatsby | Predefined themes | Learn more |
| Mailchimp | Manage email sign ups | Visit |
| Cloudflare | Deploy your page on cloudflare workers | Create an account |
| Namecheap.com | Buy a domain name | Visit |
Gatsby
First, we will install the Gatsby CLI
npm install -g gatsby-cliNext, we will initialize our project using a standard landing page theme that is easy to customize and has a professional look and feel.

So go ahead and run the following command.
gatsby new awesomelanding https://github.com/keegn/gatsby-starter-saas-marketingOnce the project is set up, we will launch the development build to see our landing page in action.
cd awesomelandinggatsby developand preview our project @ localhost:8000
Mailchimp Integration
We will also set up a mailing list using Mailchimp. This will allow us to collect the contact information of interested individuals and keep them updated on the progress of our business idea. To set up the mailing list, we will first need to create a Mailchimp account, then create a sign-up form. Mailchimp will generate an embedded code snippet, but all we need is the list endpoint URL, which is the red-colored URL in the code snippet.

Now let's add this list to our gatsby project.
First we will need to install gatsby-plugin-mailchimp
1npm install gatsby-plugin-mailchimpDon't forget to add the plugin to the gatsby-config.js file and include the endpoint string
1{2 resolve: 'gatsby-plugin-mailchimp',3 options: {4 endpoint: '', // string; add your MC list endpoint here;5 timeout: 3500, // number; the amount of time, in milliseconds, that we want to allow mailchimp to respond to your request before timing out. defaults to 35006 }7 }Next, we will need to connect the email input to our mailing list.
GO ahead and open src/components/sections/header.js and start by importing the mailchimp plugin.
Then we will want to make sure our user input is sent to the mailchimp server.
To enhance the user experience, we will add a short message that confirms that the user's input has been successfully submitted. To achieve this, we will use the React useState hook,
The final version of the file should look like this.
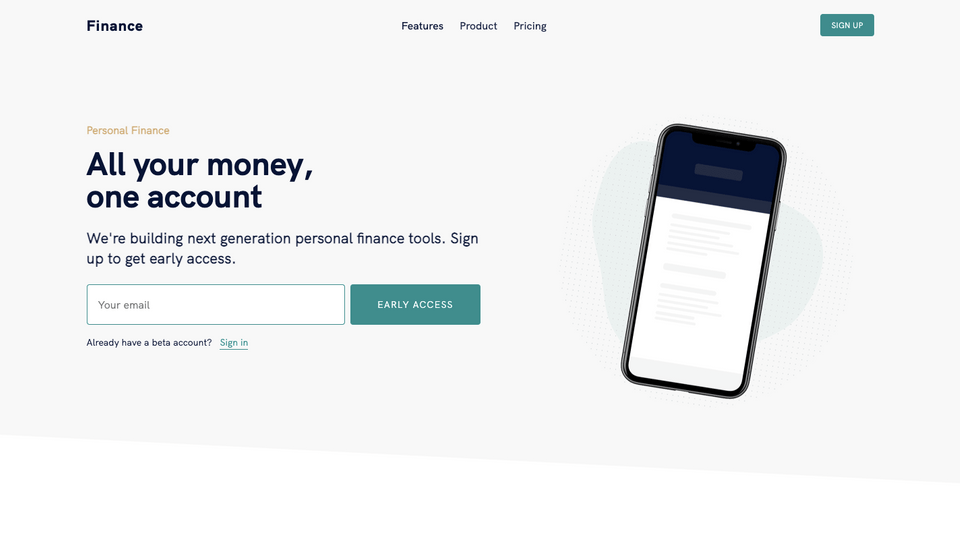
1import React, {useState} from "react"2import styled from "styled-components"3import { graphql, useStaticQuery, Link } from "gatsby"4import Img from "gatsby-image"5import addToMailchimp from 'gatsby-plugin-mailchimp'6import { Container } from "../global"78const Header = () => {9 const data = useStaticQuery(graphql'10 query {11 file(sourceInstanceName: { eq: "product" }, name: { eq: "green-skew" }) {12 childImageSharp {13 fluid(maxWidth: 1000) {14 ...GatsbyImageSharpFluid_tracedSVG15 }16 }17 }18 }19 ')20 //handling email submission and updating the user with a status message21 const [email, setEmail] = useState('');22 const [statusMsg, setStatusMsg] = useState('');23 const handleSubmit = event => {24 event.preventDefault()25 addToMailchimp(email)26 .then(data => {27 if (data.msg.includes('subscribed')) setStatusMsg("Uh Oh, Looks like you've already used this email!");28 else setStatusMsg(data.msg)29 })30 .catch(() => {31 // handle error here32 })33 }3435 return (36 <HeaderWrapper id="top">37 <Container>38 <Flex>39 <HeaderTextGroup>40 <Subtitle>Personal Finance</Subtitle>41 <h1>42 All your money,43 <br />44 one account45 </h1>46 <h2>47 We're building next generation personal finance tools. Sign up to48 get early access.49 </h2>50 <HeaderForm onSubmit={handleSubmit}>51 <HeaderInput placeholder="your email" onChange={e => setEmail(e.target.value)} />52 <HeaderButton>Early access</HeaderButton>53 </HeaderForm>54 <FormSubtitle>55 Already have a beta account?{" "}56 <FormSubtitleLink to="/">Sign in</FormSubtitleLink>57 </FormSubtitle>58 <h2>{statusMsg}</h2>59 </HeaderTextGroup>60 <ImageWrapper>61 <StyledImage fluid={data.file.childImageSharp.fluid} />62 <br />63 </ImageWrapper>64 </Flex>65 </Container>66 </HeaderWrapper>67 )68}6970export default HeaderHosting on Cloudflare
Finally, we need to host our landing page so that it is accessible to the public. There are several options for hosting such as Heroku or Netlify, but in this tutorial we will be using Cloudflare Workers. Cloudflare Workers is a great option for hosting a landing page as it offers powerful caching and latency optimization features. This will be especially useful if you plan on adding a video background to your landing page, as it will ensure that the page loads quickly and smoothly for all visitors.
So let's jump right to it.
First we will need to install the wrangler CLI
1npm install -g @cloudflare/wranglerThen we'll initialize a wrangler project
1wrangler init --siteMake sure to create a Cloudflare Worker account.
Before we can deploy our project, we'll need to login through the wrangler CLI
1wrangler loginLet's create a subdomain for development or staging releases.
1wrangler subdomainWrangler will generate a subdomain that looks like this [awesomelanding].[accountname].workers.dev
Let's navigate to the worker section on the cloudflare website to get our account ID. Add it to the wrangler.toml file in your directory.
Don't forget to set the bucket to "./public" as seen below:
1name = "awesomelanding"2type = "webpack"3account_id = "XXXXXXXXX"4workers_dev = true5route = ""6zone_id = ""78[site]9bucket = "./public"10entry-point = "workers-site"We'll generate a production build and deploy it to our subdomain using the following command
1gatsby build && wrangler publishOur landing page should now be available for preview at [awesomelanding].[accountname].workers.dev
Setting up our custom domain (optional)
If we are going to do this the right way, we'll need to purchase a domain name for our landing page. In this tutorial we will use namecheap.com
Once we've bought our domain, we'll need to head back to the Cloudflare dashboard and follow the instructions under + Add a site
We can get rid of all DNS records. We only need to create the following record:
| Type | Name | Content |
|---|---|---|
| CNAME | www | yournewlypurchaseddomain.com |
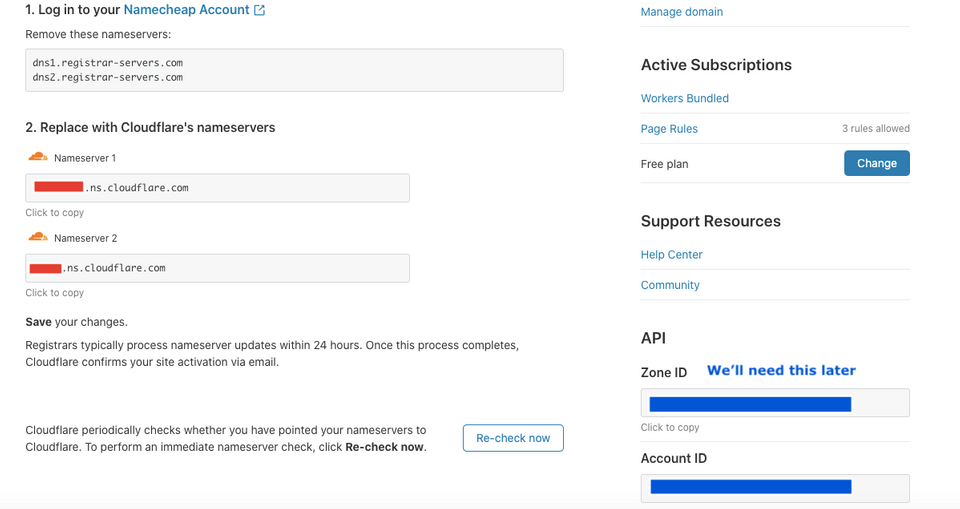
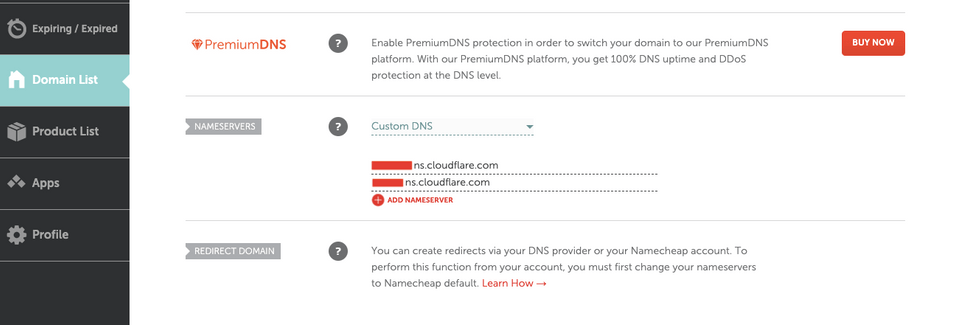
When prompted, copy the DNS records from cloudflare over to namecheap as shown below.
You will notice cloudflare generated a zone ID. Save this entry as we will need it in a few seconds.

 Cloudflare will check our DNS configuration for us.
Final steps
Great! You've made it this far. We just have a few more steps.
Remember the wrangler.toml file we worked on a few minutes ago? We can now define a production build with our newly added custom domain.
All we need to do is define the env, add the zone ID and define a route for our worker.
The newly modified file should look like this:
1name = "awesomelanding"2type = "webpack"3account_id = "XXXXXXXXX"4workers_dev = true56[env.production]7route = "mynewlypurchaseddoamin.com/*"8zone_id = "XXXXXXXXX" // told you we'd need it later910[site]11bucket = "./public"12entry-point = "workers-site"Now run the following command to check your work
1wrangler publish --env productionAnd there you have it! You now have the ability to gauge interest in your idea through a pre-launch campaign. Remember to always keep track of idea stickiness!